> ## Documentation Index
> Fetch the complete documentation index at: https://docs.yabetoopay.com/llms.txt
> Use this file to discover all available pages before exploring further.
# Quickstart
> Webhooks are callbacks that are called when a specific event occurs
Webhooks allow your application to receive real-time notifications whenever specific events occur on your Yabetoo account. Instead of continuously polling the API to check for updates, you can configure webhooks to automatically receive event data as soon as it happens.
This mechanism is essential for reacting to payment lifecycle events such as `payment_intent.succeeded`, `payment_intent.failed`, or `session.created`, allowing your backend to stay in sync with the user's payment flow.
## How Webhooks Work
1. You register a **Webhook URL** in your dashboard or integration settings.
2. When an event occurs (e.g., a payment is confirmed), Yabetoo sends an HTTP `POST` request to your endpoint.
3. The request contains a **JSON payload** describing the event.
4. Your server must respond with a `200 OK` status to acknowledge receipt.
**Security Tip:** You should always verify the webhook signature to ensure the
request genuinely comes from Yabetoo.
## How to Create a Webhook Endpoint
Follow these steps to set up a webhook endpoint for your Yabetoo integration
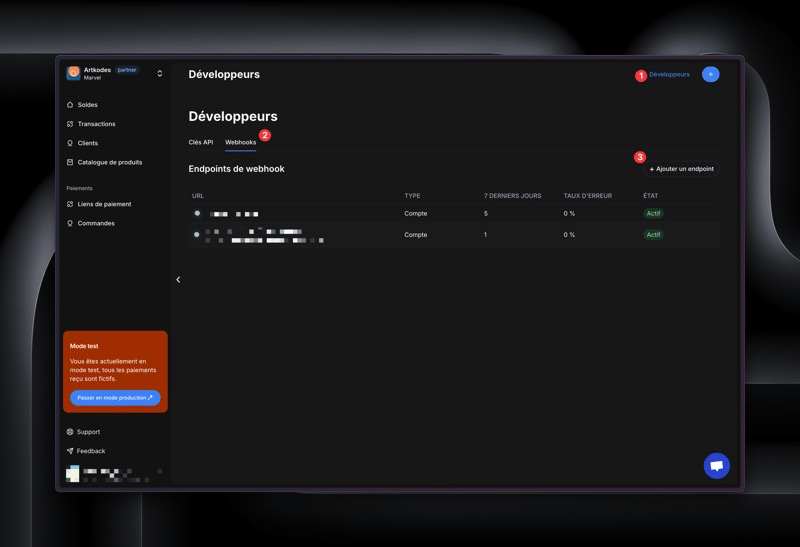 ### 1. Access the Developer Dashboard
* Log in to your Yabetoo dashboard.
* In the left-hand menu, click on **Developers**.
### 2. Open the Webhooks Tab
* Once on the Developer page, click on the **Webhooks** tab at the top (next to “API Keys”).
### 3. Add a New Endpoint
* Click on the ➕ **Add Endpoint** button located in the top right corner.
### 4. Configure the Webhook
* Enter the full URL of your webhook endpoint (e.g. `https://your-domain.com/webhook/yabetoo`).
* Choose the event types you want to subscribe to (e.g. `payment_intent.succeeded`, `session.created`, etc.).
* Click on **Save** to register your webhook.
Your endpoint **must accept HTTP `POST` requests** from Yabetoo and respond with a `200 OK` status code within a reasonable time (usually under 5 seconds).
If your server fails to respond or returns a non-2xx status, Yabetoo will **retry** the delivery several times over a short period.
## Webhook Security Headers
Each webhook request sent by Yabetoo includes a set of custom HTTP headers that allow you to:
* Verify the **authenticity** of the request.
* Identify the **type of event**.
* Track individual webhook **deliveries**.
* Prevent **replay attacks** using the timestamp.
Below is a list of headers you should expect and handle:
| Header Name | Description |
| ----------------------------- | -------------------------------------------------------------------------------------------------------------- |
| `X-Yabetoo-Webhook-Signature` | A HMAC-SHA256 signature generated using your webhook secret. Used to verify that the payload was not modified. |
| `X-Yabetoo-Webhook-Timestamp` | The Unix timestamp (in seconds) when the request was sent. Use this to prevent replay attacks. |
| `X-Yabetoo-Webhook-Event` | The event type (e.g. `payment_intent.succeeded`, `session.created`). |
| `X-Yabetoo-Webhook-Id` | A unique identifier for the webhook delivery. Useful for debugging or logging. |
***
### Example of Raw Headers
```http theme={null}
POST /webhook/yabetoo HTTP/1.1
Host: your-domain.com
Content-Type: application/json
X-Yabetoo-Webhook-Signature: v1=bb8f4e3a6a9d...
X-Yabetoo-Webhook-Timestamp: 1713108000
X-Yabetoo-Webhook-Event: payment_intent.succeeded
X-Yabetoo-Webhook-Id: evt_92JsDK8WqRjaoA
```
## Verifying Webhook Signatures
To ensure that webhook requests are legitimately sent by Yabetoo and have not been tampered with, you must verify the signature included in the `X-Yabetoo-Webhook-Signature` header.
### Verification Steps
Follow the steps below to securely validate incoming webhook requests:
### 1. Retrieve Your Webhook Secret
Get your **Webhook Secret** from your Yabetoo dashboard under the Webhooks section. This secret is used to compute the HMAC signature.
### 2. Extract the Signature and Timestamp
From the request headers, extract the following:
* `X-Yabetoo-Webhook-Signature` — contains the signature string, e.g.: `t=1620123456,v1=abcdef1234567890abcdef1234567890`
* `X-Yabetoo-Webhook-Timestamp` — the timestamp used in the signature
### 3. Build the Signed Payload
Create the string to sign by concatenating:
```text theme={null}
{timestamp}.{raw_body}
```
Where:
* `timestamp` = value from `X-Yabetoo-Webhook-Timestamp`
* `raw_body` = the exact raw request body, as a UTF-8 string (before parsing JSON)
**Example:** `1713108000.{"id":"evt_92JsDK8WqRjaoA","type":"payment_intent.succeeded"}`
### 4. Compute the HMAC Signature
Compute the HMAC using **SHA-256** with your webhook secret as the key:
```javascript theme={null}
const crypto = require("crypto");
const secret = "your_webhook_secret";
const payload =
'1713108000.{"id":"evt_92JsDK8WqRjaoA","type":"payment_intent.succeeded"}';
const hmac = crypto.createHmac("sha256", secret).update(payload).digest("hex");
```
### 5. Compare the HMAC
Compare the computed HMAC with the value from `X-Yabetoo-Webhook-Signature`.
Use a **constant-time comparison** to compare your computed signature with the one received in the header (`v1=...`). This helps prevent timing attacks.
If the signatures match, the request is authentic and can be trusted.
***
### JavaScript Example (Node.js)
```js theme={null}
const crypto = require("crypto");
function verifyWebhookSignature(payload, signature, timestamp, secret) {
// Build the signed payload
const signedPayload = `${timestamp}.${JSON.stringify(payload)}`;
// Compute the HMAC-SHA256 signature
const expectedSignature = crypto
.createHmac("sha256", secret)
.update(signedPayload)
.digest("hex");
// Compare signatures (use constant-time comparison)
return crypto.timingSafeEqual(
Buffer.from(signature),
Buffer.from(expectedSignature)
);
}
```
### 1. Access the Developer Dashboard
* Log in to your Yabetoo dashboard.
* In the left-hand menu, click on **Developers**.
### 2. Open the Webhooks Tab
* Once on the Developer page, click on the **Webhooks** tab at the top (next to “API Keys”).
### 3. Add a New Endpoint
* Click on the ➕ **Add Endpoint** button located in the top right corner.
### 4. Configure the Webhook
* Enter the full URL of your webhook endpoint (e.g. `https://your-domain.com/webhook/yabetoo`).
* Choose the event types you want to subscribe to (e.g. `payment_intent.succeeded`, `session.created`, etc.).
* Click on **Save** to register your webhook.
Your endpoint **must accept HTTP `POST` requests** from Yabetoo and respond with a `200 OK` status code within a reasonable time (usually under 5 seconds).
If your server fails to respond or returns a non-2xx status, Yabetoo will **retry** the delivery several times over a short period.
## Webhook Security Headers
Each webhook request sent by Yabetoo includes a set of custom HTTP headers that allow you to:
* Verify the **authenticity** of the request.
* Identify the **type of event**.
* Track individual webhook **deliveries**.
* Prevent **replay attacks** using the timestamp.
Below is a list of headers you should expect and handle:
| Header Name | Description |
| ----------------------------- | -------------------------------------------------------------------------------------------------------------- |
| `X-Yabetoo-Webhook-Signature` | A HMAC-SHA256 signature generated using your webhook secret. Used to verify that the payload was not modified. |
| `X-Yabetoo-Webhook-Timestamp` | The Unix timestamp (in seconds) when the request was sent. Use this to prevent replay attacks. |
| `X-Yabetoo-Webhook-Event` | The event type (e.g. `payment_intent.succeeded`, `session.created`). |
| `X-Yabetoo-Webhook-Id` | A unique identifier for the webhook delivery. Useful for debugging or logging. |
***
### Example of Raw Headers
```http theme={null}
POST /webhook/yabetoo HTTP/1.1
Host: your-domain.com
Content-Type: application/json
X-Yabetoo-Webhook-Signature: v1=bb8f4e3a6a9d...
X-Yabetoo-Webhook-Timestamp: 1713108000
X-Yabetoo-Webhook-Event: payment_intent.succeeded
X-Yabetoo-Webhook-Id: evt_92JsDK8WqRjaoA
```
## Verifying Webhook Signatures
To ensure that webhook requests are legitimately sent by Yabetoo and have not been tampered with, you must verify the signature included in the `X-Yabetoo-Webhook-Signature` header.
### Verification Steps
Follow the steps below to securely validate incoming webhook requests:
### 1. Retrieve Your Webhook Secret
Get your **Webhook Secret** from your Yabetoo dashboard under the Webhooks section. This secret is used to compute the HMAC signature.
### 2. Extract the Signature and Timestamp
From the request headers, extract the following:
* `X-Yabetoo-Webhook-Signature` — contains the signature string, e.g.: `t=1620123456,v1=abcdef1234567890abcdef1234567890`
* `X-Yabetoo-Webhook-Timestamp` — the timestamp used in the signature
### 3. Build the Signed Payload
Create the string to sign by concatenating:
```text theme={null}
{timestamp}.{raw_body}
```
Where:
* `timestamp` = value from `X-Yabetoo-Webhook-Timestamp`
* `raw_body` = the exact raw request body, as a UTF-8 string (before parsing JSON)
**Example:** `1713108000.{"id":"evt_92JsDK8WqRjaoA","type":"payment_intent.succeeded"}`
### 4. Compute the HMAC Signature
Compute the HMAC using **SHA-256** with your webhook secret as the key:
```javascript theme={null}
const crypto = require("crypto");
const secret = "your_webhook_secret";
const payload =
'1713108000.{"id":"evt_92JsDK8WqRjaoA","type":"payment_intent.succeeded"}';
const hmac = crypto.createHmac("sha256", secret).update(payload).digest("hex");
```
### 5. Compare the HMAC
Compare the computed HMAC with the value from `X-Yabetoo-Webhook-Signature`.
Use a **constant-time comparison** to compare your computed signature with the one received in the header (`v1=...`). This helps prevent timing attacks.
If the signatures match, the request is authentic and can be trusted.
***
### JavaScript Example (Node.js)
```js theme={null}
const crypto = require("crypto");
function verifyWebhookSignature(payload, signature, timestamp, secret) {
// Build the signed payload
const signedPayload = `${timestamp}.${JSON.stringify(payload)}`;
// Compute the HMAC-SHA256 signature
const expectedSignature = crypto
.createHmac("sha256", secret)
.update(signedPayload)
.digest("hex");
// Compare signatures (use constant-time comparison)
return crypto.timingSafeEqual(
Buffer.from(signature),
Buffer.from(expectedSignature)
);
}
```